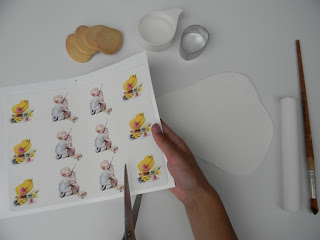
 Step 1
Gather your equipment, you will need
1 x A4 sheet of edible wafer paper with your images (my images are free via google image search such as these from Little Grey Bungalow)
(I had mine printed at http://www.allanscakes.com.au/ but
you can also get them done online at http://www.cakesaroundtown.com.au/)
12 x freshly baked egg shaped sugar cookies
1 x egg cookie cutter
Small cup of water
Mini rolling pin
Clean new paintbrush
500 grams Orchard white fondant of Pettinice fondant
½ cup of strained and gently warmed jam
Clean pastry brush
A small cup of Cornstarch powder
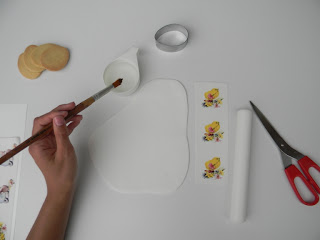
 Step 2
Lightly dust a clean flat surface with cornstarch and roll out your fondant till thin
and smooth using your mini rolling pin.
Using sharp scissors cut your edible sheet into 4 long strips, this will make it
easier for you to manoeuvre and cuts out wastage.
 Step 3
Using your new paint brush and the clean water lightly and quickly brush some water
over the fondant surface.
Don’t make the fondant too wet or it will become too sticky.
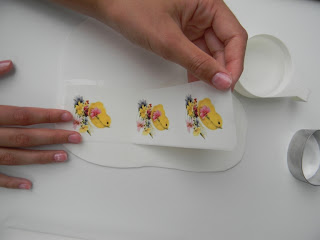 Step 4
Make sure your hands are dry for this step.
Gently remove the edible paper from the backing paper following manufacturers
instructions and very gently place the edible image on top of the damp fondant
surface.
Very gently smooth the surface with your dry fingers, don’t be rough or you’ll
damage or smear the image.
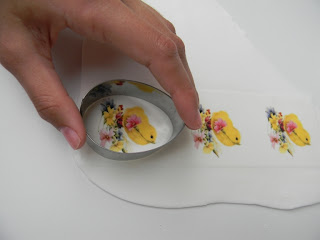
 Step 5 and 6
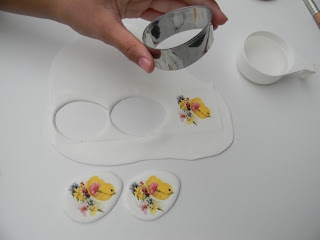
Using the clean egg cookie cutter dipped in some cornstarch (same cutter you used to
make your cookies with) firmly press into the fondant with edible image to cut
out the egg shape.
Set the shapes aside, do not handle them too much and be gentle.
 Step 7
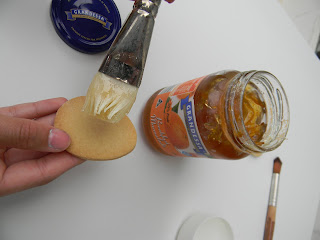
Using a clean pastry brush “paint” on a light film of jam onto each cookie. This will
act as “glue” to adhere the fondant to the cookie without making the cookies
soggy and brittle.
I usually use either strained raspberry jam or marmalade that I’ve gently heated
in the microwave for 10 seconds, it depends what flavour my cookies are.
 Step 8
Gently lift each fondant egg with edible image attached and place on top of the jam
smeared cookie. Gently pat with your finger till the fondant is flush with the
cookie and there are no air bubbles or gaps.
Set aside to dry for 30 minutes and then place in cellophane bags tied with ribbon
to keep them fresh.
 Tip: I find doing the above steps in small batches work best (do about 3 cookies at
a time), that way the fondant won’t dry out by the time you get to the last lot
of egg cookies.
you can also get them done online at http://www.cakesaroundtown.com.au/)
12 x freshly baked egg shaped sugar cookies
1 x egg cookie cutter
Small cup of water
Mini rolling pin
Clean new paintbrush
500 grams Orchard white fondant of Pettinice fondant
½ cup of strained and gently warmed jam
Clean pastry brush
A small cup of Cornstarch powder
 Step 2
Lightly dust a clean flat surface with cornstarch and roll out your fondant till thin
and smooth using your mini rolling pin.
Using sharp scissors cut your edible sheet into 4 long strips, this will make it
easier for you to manoeuvre and cuts out wastage.
Step 3Using your new paint brush and the clean water lightly and quickly brush some water
over the fondant surface.
Don’t make the fondant too wet or it will become too sticky.
 Step 4
Make sure your hands are dry for this step.
Gently remove the edible paper from the backing paper following manufacturers
instructions and very gently place the edible image on top of the damp fondant
surface.
Very gently smooth the surface with your dry fingers, don’t be rough or you’ll
damage or smear the image.

 Step 5 and 6
Using the clean egg cookie cutter dipped in some cornstarch (same cutter you used to
make your cookies with) firmly press into the fondant with edible image to cut
out the egg shape.
Set the shapes aside, do not handle them too much and be gentle.
 Step 7
Using a clean pastry brush “paint” on a light film of jam onto each cookie. This will
act as “glue” to adhere the fondant to the cookie without making the cookies
soggy and brittle.
I usually use either strained raspberry jam or marmalade that I’ve gently heated
in the microwave for 10 seconds, it depends what flavour my cookies are.
 Step 8
Gently lift each fondant egg with edible image attached and place on top of the jam
smeared cookie. Gently pat with your finger till the fondant is flush with the
cookie and there are no air bubbles or gaps.
Set aside to dry for 30 minutes and then place in cellophane bags tied with ribbon
to keep them fresh.
 Tip: I find doing the above steps in small batches work best (do about 3 cookies at
a time), that way the fondant won’t dry out by the time you get to the last lot
of egg cookies.
Do NOT refrigerate or the images will fade and run


