Tuesday, December 20, 2011

Ginger spice cookie house recipe


Ginger spice cookie houses


200g butter softened
200g brown sugar
1 egg lightly beaten
400g plain flour sifted
1 tablespoon crushed ginger (I use the ones from the jar)
2 tsps of All spice (or you can mix some cinnamon and clove together to make up 2 tsps)
1 tablespoon Golden syrup
Template for the house can be found on Torie Jayne's blog


1) Cream butter and sugar untill mixed and creamy but do not overbeat.

2) add egg untill combined and then sift in the flour, ginger and All Spice.

3) mix with your hands till a dough forms, if its a little dry add the 1 tablespoon of syrup. Gather into a ball, wrap in clingwrap and pop in the fridge for atleast 1 hour.

4) Preheat oven to 180 degrees Celcius

5) Roll out dough to about 5mm thick and cut out gingerbread house shapes. Template can be found on Torie Jayne's blog, its still by far the cutest and easiest template to make and use :-)

6) Pop on a tray lined with greaseproof paper and bake for 12-15 minutes (my oven is gas and it took 15 min)

This yields 2 small houses or 1 big house. Its more a ginger spice cookie recipe rather than a proper gingerbread recipe as I find it is sturdier than the standard gingerbread recipe. I found it easier to use with less breakage when handeling the different walls and roof pieces. It also remains flat and won't spread while baking.


Oreo pops I made for Kindy


2 packets of Oreo cookies
3/4 packet cream cheese
1 bag of Nestle milk chocolate buttons
1 bag of pretzels, broken in half to form antlers
1 bag of mini m&m's
50g of white fondant (for the eyes)
22 x lollypop sticks
1 x styrofoam dummy cake (for pops to dry on)
black edible texta


1) In a food processor mix the 2 packets of Oreos untill it resembles fine crumbs

2) add softened 3/4 packet cream cheese and mix into the Oreo crumbs till a soft dough forms

3) roll round balls the size of a standard walnut and pop them on some greaseproof paper and pop them in the fridge for 10 minutes.

4) Remove your Oreo balls from the fridge and set aside. Melt bag of nestle choc buttons in a medium bowl (make sure its clean and dry)

5) Now dip each lollypop stick in the melted chocolate and then pop them into each Oreo ball. Leave to harden for 5 minutes.

6) Dip each Oreo pop in the melted chocolate and gently tap on the side of the bowl to remove excess chocolate. While the chocolate is still soft (but not dripping) pop a mini m&m for the nose, place the pop upright in a styrofoam dummy cake and gently press in some pretzel antlers.

7) Let the pop dry completely.

8) Once dry, roll out tiny balls of white fondant and stick 2 balls onto each pop with some sugar glue to form the eyes. Use a toothpick to indent the pupil, I also used a toothpick dipped in black food colouring to emphasise each pupil.

9) Using a black edible texta draw each mouth on the pops.


MERRY CHRISTMAS EVERYONE :-)


xxx


Leoni

Friday, December 9, 2011

Merry Christmas - Delftware luncheon

Theme: Baby Hugo’s first Christmas – Delft blue

*********As featured by Amy Atlas Events ***********


Styled by:
Louisa and Melissa from The Little Big Company http://www.tlbc.com.au/
Lilian from Lily Chic Event http://www.shoppewithlily.com.au/
Leoni from Just call me Martha http://www.justcallmemarthaa.blogspot.com/


What do you get when Little big Company, Lily Chic Events and Just call me Martha collaborate? A lot of fun and laughter and this lovely Christmas lunch created for baby Hugo who will be celebrating his first Christmas with his parents this year.The inspiration for the Christmas lunch came from the blue and white pottery called Delftware (Delft pottery) which is made in and around Delft in the Netherlands, since baby Hugo’s mum was born there. The luncheon was very intimate and fun with each guest bringing along a homemade favourite family recipe to share at the party.


Close up of the gingerbread house on top of the main cake.

Double stacked Christmas fruit cake with ginger bread house with hand painted details, the first time I've tried to paint details like this onto a cake. Not easy!! lol


Gorgeous Liandra holding some vintage baubles. Dress by Itchykoo.


Mini Christmas cake parcels.


Some of the food on the table was mini Fruit cake parcels, Spice cookie baubles (traditional Dutch cookie recipe), ginger cookie Delft baubles, lamington pops (a nod at baby Hugo’s Australian heritage), coconut snow cupcakes, passion fruit Cheesecake, cherry & fig Christmas pudding, vanilla bean and caramel eggnog and the show stopper cake, a double stacked Christmas fruit cake with ginger bread house with hand painted details! Yumm!


Close up of the spice cookies with delft edible image. I loved how they turned out.


To keep cost down the crackers on the dining table were home made using craft toilet rolls, fabric and scrapbook paper. We also used a Christmas printable set created by Ham and Pea Design & Paperie to embellish the crackers and dress up the dessert and main table.


See this party in print in the Peekaboo magazine please visit website for subscription details or where you can pick up a copy of the magazine.


Photography by Clair Bremner http://www.clairbremner.com/


Vendor list:
Styling/stock and food by
The Little Big Company
Lily Chic Events
Just call me Martha
Photography: Clair Bremner – See be Art
Printables: Ham and Pea Design & Paperie
Felt items: My Sweet Tashie
Christmas dress: Itchykoo

Advent tutorial - recycled tins

For the past 4 years we have been doing advent calendars in my household, each year we choose a different theme and holder. We've had the traditional mini santa stockings, we've done mis-matching socks on pegs, we've done mini boxes and this year recycled tins. In fact, with 4 young children I find it challenging to come up with something big enough each year that will hold 4 x lollies on some of the advent days. Our advent is also different in that it doesn't contain lollies for each day, this is purely out of neccesity as the advent use to sag with the weigh of 4 x lollies x 24 days lol. Instead, each year, half the days contain notes and the other half lollies, it is all mixed up so my girls never know which day will be a note or which day will be a lolly.

The notes usually contain activities such as:
- See the Christmas lights
- Have a picnic dinner in the garden or on the living room floor
- You choose what's for dinner
- ice cream sundae for dessert tonight
- day at the beach today
- day at the pool today
- Make a gingerbread house today
- make Christmas cookies
- choose a gift for the poor from the wishing tree today
- $5 Kriss Kringle, you choose the gift and then swap with your sister
- Pick a movie to watch (can be a new DVD to rent or at the movie hall)
- Put up the Christmas tree, each child has to make an ornament for the tree
- Go to the zoo

Here is a cute tutorial of this years advent calendar, its very simple and costs little to no money and is environmentally friendly :-)


Step 1:
Gather your supplies, you will need
24 x empty, clean cans with labels removed.
Some fabric scraps
Some ribbon and lace scraps
Elastic bands
Scissors
Glue
2” inch round scallop cutter
Some paper
Pencil
Step 2: Pop your tin on some paper and draw a border around the shape of your tin which is 2”inch wider than your tin.
Cut out your paper circle as this will now be your template for cutting your fabrics.


Step 3 : Iron your fabric scrap and pin your circle template to the fabric and cut around the circle. You will need 24 circles, one for each tin.


Step 4: On your computer create the numbers 1 to 24 in fancy font and print out on an A4 sheet. Using your scallop cutter, cut out each number for each tin.


Step 5: Fill your tin with a treat or a secret memo (such as “tonight we will visit and see the Christmas lights”), then place the circle fabric over the opening of the tin and secure with a thin elastic.
Tie a pretty ribbon into a bow around the tin and elastic to hide it. Stick down your scallop paper with number and tie some pretty lace or ric rac around the bottom of each tin.


Step 6: Stack your tins into the shape of a Christmas tree, with no 1 on the top and the numbers 18 – 24 on the bottom.


Friday, November 11, 2011

Aqua and orange cake + dollhouse goodies

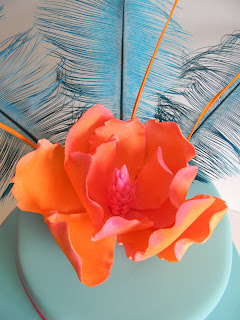
Here are a few things that have kept me busy these past few weeks. A gorgeous bright 50th birthday cake for a close friend of mine. Her party was on ladies Oak's day so I wanted something showy and bright as a topper so made a bright orange magnolia with peacock feathers as accent. Cake was white choc mud filled with strawberry buttercream.

Close up of the magnolia, yes I know they don't come in this colour ;-)


Next some rainbow cookies........


and some doll pops for a dollhouse party styled by Little Big Company. Lou and Mel had the party featured on Amy Atlas this week, well done ladies :-)


and this is the dollhouse cake I made for the dollhouse party. White mudcake, raspberry buttercream and white choc fondant, it ended up being one HEAVY cake!!

Photography by Casamento Photography.

Monday, October 31, 2011

Gorgeous rainbow party by Inviteme

A couple of months ago I shared with you Inviteme's Snow white party which I thought was super cute with some very clever ideas. Today I wanted to show you the rainbow party Simone from Inviteme created for her daughter. I particularly love this party because it can easily be re-created by anyone without having to spend thousands of dollars on props. Mind you if you did want some party props to go along with the printables, Inviteme has a lovely selection to choose from :-)


How gorgeous is this cake! I love how lollies was used as accent to create the rainbow colours on this cake. No fancy fondant work, no hoity-toity modelled flower, just scrummy cake and lollies. Simplicity at its best!


Love these cute drinks, I know my daughter would love to drink from rainbow coloured bottles.


Another cute idea, heavenly marshmallows, makes me want to dive right in. Yummm (psssst, might sneakily file this away to make myself one day).


All up a fantastic party Simone :-) I love what you created for your daughter and I bet she loved it too.


xxx


Sunday, October 23, 2011

Cake, cake and MORE cake - Kikki K party

Well its been another busy few weeks in our household, school holidays came and went, a visit from MIL, hubby was home for 4 weeks and then plenty of cakes to make. Last week I had the honor of making Kikki K's 10 year anniversary cake, it wasn't only a massive challenge but a lot of fun. Today I was lucky enough to spot this article in The Sunday Age about my cake. How exciting!

I was asked to create edible stationary for a desk that would be on display at the main entrance of the venue. So I proceeded to make some folders, magazine holder, storage boxes, pens, scissors, to-do-list, rubber stamps, 3 am book and calculator. All up I was busy for 2 weeks prepping and making the sugar items and then 4 days non stop baking and covering of cakes. My poor oven still hasn't quite recovered lol I went through 22 kilos of fondant and about 50 eggs and I shudder to think how much butter and sugar went into all this :-)


Here is a close up of the 3am book and rubber stamps, 100% edible made from cookies and fondant.


My favourite item, cookie calculator covered in fondant and numbers + writing made from edible paper. It looked so real everyone kept touching it.


80 favour boxes made to look like miniature Kikki K storage boxes, these almost did my head in!! Thank you Kristina for believing in me and trusting me to make your cake, I am truly humbled xxx


This is another cake I completed yesterday, for a 40th birthday party. Oh how I struggled making this cake due to fatigue. I just could NOT for the life of me cover the main cake on Friday, I tried 3 times and gave up, then went on to making the toppers and ruined all the edible images beyond repair (all 21 of them!) and then burnt dinner. I had a good cry and called it a day. I did however wack another cake in the oven in case the 1st cake would collapse after being recovered for the 4th time. In the morning I managed to save the bottom part of the cake (the top was mangled after pulling off the icing) and I trimmed it + popped on the freshly baked cake I made the night before. This time I was able to cover the cake within 10 minutes. I baked the cupcakes, iced them, made the toppers and the topper for the cake all before 3pm, 1 hour before it was due PHEW! I originally was going to paint the image onto the cake with edible paste but due to time constraints had to settle for an edible image placed on a fondant plaque.


Close up of one of the cupcakes, edible image using blue bird design from Jesska Hoff's artwork. My husband was kind enough to hotfoot down to Boronia to get the edible images reprinted, this saved me a lot of time.


Another request I had was for these cute Super Hero cookies, cake and cupcakes for Little Sooties Super Hero party which was later featured on Amy Atlas :-) Thetis from Little Sooti had done a wonderful job styling the party :-)

Tuesday, October 11, 2011

October cakes

Some more lovely goodies to show you this month. This lovely cake was made for my daughter's grade 1 teacher Ms Fitzgerald, its a 6" inch vanilla sponge with vanilla bean buttercream icing and covered in white choc fondant. The matching cupcakes were made for the class.


Took me AGES to make the flowers for the mini bouquet, but it was done in the end. I still struggle with blending my colours, so need to practice with that.


These cute cupcakes were baked for a fundraiser for the Cancer Council Fund, the theme was "a little bit of pink".


This gorgeous + fun cake was made for Kikki K's CREATE Photobook range which was launched recently. I loved making this photo album and camera cake.


Close up of the camera cakelett, cake on the inside, fondant on the outside.


Matching camera cupcakes in orange blossom flavour with orange zest buttercream topping.


Saturday, September 17, 2011

Princess castle and In the night garden cakes

Sorry for being missing in action folks but its been one hectic month so far. I completed a wedding shoot with Lily Chic Events a few weeks back (I've shared the photos in the next post below), did some sample cakes for a big event in October, completed an In the Night garden themed cake and cookies, created an album cake + camera cupcakes (will show them at a later date when I get permission), completed a Princess castle cake, cupcakes, cookies and pops AND a super hero cake, cupcakes and cookies (can't show them yet) + prepped for a Christmas photo shoot coming up next week. Its enough to make me stress lol

Anyway, first up is this cute as a button castle cake, the design is from the lovely Debbie Brown as I have her book "Gorgeous and Gruesome". Its a 6" inch round triple stacked double choc cake with fudge choc buttercream icing and covered in white choc fondant.
This cake took me AGES to complete, I completely under estimated the time it would take to do all the small details, it simply took forever! It was however a super fun cake to make and I made it in the colours of the birthday girl Hanna's party which is red, white and pink.

Close up of the figurine, I was quite happy with how she turned out, I still need to improve my figurine limbs, they still look a little too "stiff" for my liking.


I also created these super cute matching princess pops. It is pink coconut ice covered in skin tone white chocolate and yellow chocolate hair. The nose, crown and lips is made from white choc fondant and the eyes from edible pen.


Then some matching mini raspberry compote cupcakes with fresh raspberry compote buttercream.


Mtaching cookies, I seriously need to do a piping class, I still struggle with piping to the point that I am getting scared to do it lol


In the night garden cookies I made last week.


Matching In the night garden birthday cake.


Hope you enjoyed the photo's, lots more to come so I'll post them as I get more time to do so.


xxx

Leoni

Black & white TIME wedding shoot.

Another feature on the Amy Atlas website, wow! I was so happy to see our wedding photo shoot featured by the lovely Amy and her team, it always gives me a thrill to be featured. Thank you Amy and team :-))

A few weeks ago Lillian from Lily Chic Events and I put together this classy yet fun wedding shoot at the Woodlands Golf Club in Mordialloc. The theme was TIME with the colour pallette being back & white with pops of bright colour. Suzanna from Mon Tresor provided the gorgeous printables for the shoot.

Rose and strawberry meringue kisses


Chocolate and hazelnut wedding bon-bons


Zesty orange macarons with creamy orange filling


Gorgeous 3 tier wedding cake I designed for the shoot, I wanted something simple, elegant yet with a modern wow factor.


This gorgeous vintage button and brooch bouquet was supplied by Lillybuds Bespoke Button Bouquets and Brooch Bouquets, isn't it gorgeous? I love this piece and kept photographing it lol


Gorgeous flowers were arranged by Lillian herself (Lily Chic Events), Lil is one seriously talented lady who can do almost anything!


Here you can see Mon Tresors printables in action, isn't it lovely? Great job Suzanna ;-), all the crockery and party ware can be found in Lillian's shop called Shoppe with Lily.


Background fabric in the three frames on the wall is from Thea and Sami, LOVE their fabric!!


My Raspberry parfaits displayed on Lillians lovely lacy platter, I LOVE this platter from Shoppe with Lily


Remember how I was looking for black Japanese soup spoons recently? Well I could not for the life of me find any so popped the vanilla bean mousse on edible dark choc spoons instead. Yummy!


Some of the subtle hints at the TIME theme, cupcakes with clock toppers (all edible).


Black and white sugar cookies, some were embossed while others had edible prints on them.


I hope you enjoyed sharing some of the photo's we took of the wedding shoot.


xxxx

Leoni