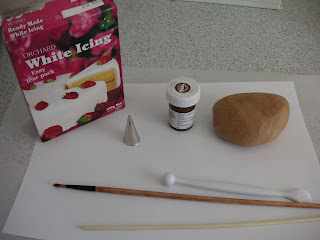
My friend Nat (Dec 04 group) wants to have a pony party for her daughter's 5th birthday this year and was going to google how to make a fondant horse. Well I googled and there are no instructions for a horse. Sheep, mouse, pig and cow yes, horse, nup, so I wipped up this little guy this afternoon to show Nat some of the basics. Hopefully I've explained it properly. Firstly I use Orchard ready made fondant from the supermarket as homemade fondant is too sticky to sculpt with. You'll also need some brown colouring paste (not liquid) I've bought the Wilton brand, a kebab stick, piping tip, paint brush and ball tool.
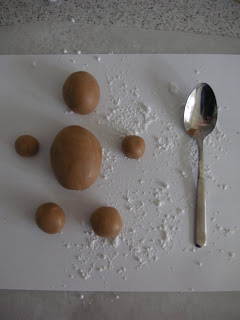
Split your fondant into 6 balls, 1 large one for the body, a smaller one for the head, two for the legs and 2 for the arms. I've put a dessert spoon next to the balls to show scale. This topper will fit nicely on a 18cm/7 inch round cake.
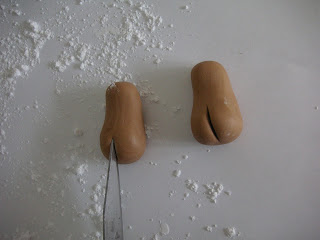
Roll your legs into two sausage type shapes and use a sharp knife to mark the hooves. You could make a horseshoe out of grey fondant for each leg but I was feeling lazy.
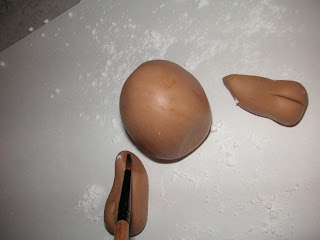
Using your clean paintbrush and some water attach the legs to the body. The trick is not to handle the body parts too much or they loose their shape.
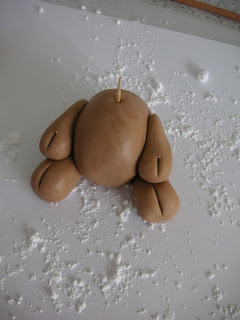
Do the same for the arms, attach to the body with a bit of water and stick a toothpick or a piece of raw spaghetti into the body to act as a support for the head.

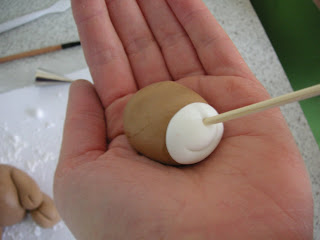
Next cut a piece of white fondant with the back end of a piping tip and shape it into the snout of the horse. Attach with a bit of water and use the back of the piping tip to form its mouth. Use a kebab stick to make its mouth if you want the horse to look surprised.
Now use the kebab stick to make two holes in the horses snout to represent the nostrils.
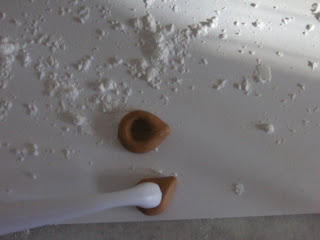
Break off two small pieces of brown fondant and shape into cones. Flatten the cones with a ball tool on one end and squeeze the pointy tip to form the ears. Attach to head with a bit of water.
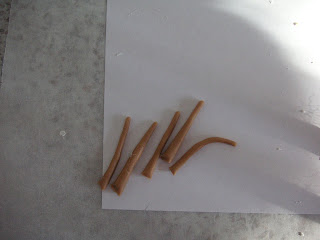
Take a few bits of fondant, make into thin sausages by rolling between your fingers to represent horse mane. Trim to fit the horses head and attach using some water. Use a toothpick to gently seperate the hair and position it on the head. Tweezers also is a good tool for this.

Viola, a sitting horse (easiest postion to make, and easiest postion to move without breaking) Leave to dry for about 48hrs, do not touch or move it while drying or it will loose its shape.
 My friend Nat (Dec 04 group) wants to have a pony party for her daughter's 5th birthday this year and was going to google how to make a fondant horse. Well I googled and there are no instructions for a horse. Sheep, mouse, pig and cow yes, horse, nup, so I wipped up this little guy this afternoon to show Nat some of the basics. Hopefully I've explained it properly. Firstly I use Orchard ready made fondant from the supermarket as homemade fondant is too sticky to sculpt with. You'll also need some brown colouring paste (not liquid) I've bought the Wilton brand, a kebab stick, piping tip, paint brush and ball tool.
 Split your fondant into 6 balls, 1 large one for the body, a smaller one for the head, two for the legs and 2 for the arms. I've put a dessert spoon next to the balls to show scale. This topper will fit nicely on a 18cm/7 inch round cake.
 Roll your legs into two sausage type shapes and use a sharp knife to mark the hooves. You could make a horseshoe out of grey fondant for each leg but I was feeling lazy.
 Using your clean paintbrush and some water attach the legs to the body. The trick is not to handle the body parts too much or they loose their shape.
 Next cut a piece of white fondant with the back end of a piping tip and shape it into the snout of the horse. Attach with a bit of water and use the back of the piping tip to form its mouth. Use a kebab stick to make its mouth if you want the horse to look surprised.
 Now use the kebab stick to make two holes in the horses snout to represent the nostrils.
 Break off two small pieces of brown fondant and shape into cones. Flatten the cones with a ball tool on one end and squeeze the pointy tip to form the ears. Attach to head with a bit of water.
 Take a few bits of fondant, make into thin sausages by rolling between your fingers to represent horse mane. Trim to fit the horses head and attach using some water. Use a toothpick to gently seperate the hair and position it on the head. Tweezers also is a good tool for this.
 Viola, a sitting horse (easiest postion to make, and easiest postion to move without breaking) Leave to dry for about 48hrs, do not touch or move it while drying or it will loose its shape.
oooh thank you so much Leoni!!! I googled it after leaving you a message on FB and couldnt find a darn thing!! I have 3 months to get some pratice in lol!! Thanks again :)
ReplyDeleteLeoni that was a great tutorial!! Thank you so much for taking the time out of your already busy life to 'whip' this up!
ReplyDeleteJust a quick question. How do you think these will go in humid climates? I know you can't refrigerate the Orchard Icing. This looks like a great, easy way to decorate a cake for Emily but I'm concerned about the humidity issue.
Bec, as long as you let them dry properly when made I'd store them with some greaseproof baking paper in an airtight container out of sunlight (dark cupboard) Like I told Nat, decorate your cake/cupcakes the day before the party and keep your cake away from the sun and don't put the cake in a container or it will sweat. I'd also use very little butter (infact use Copha instead) when making the icing to go on your cake, or it will melt off!
ReplyDeleteLast year for my sister's wedding her two tier fondant wedding cake had no issues even though her wedding day was mega hot and steamy.
wow great tutorial Leoni!
ReplyDeleteThat is so adorable. I'll certainly be coming back to this tutorial when I'm next making a cake.
ReplyDeleteHow did you make the eyes for the horse?
ReplyDeleteBrilliant tutorial - literally no other 'how to make a fondant horse' instructions on the whole web!
ReplyDeleteSoooo cute, thanks! I'm making my first fondant cake after 4 Wilton classes & want to make a B-day cake for a little boy's cowboy themed party!
ReplyDeleteSarah, I used a tooth pick to make the eyes and once the fondant is dry I used the same toothpick to apply some black food paste in the holes to make the eyes stand out more.
ReplyDeleteSo you can make the cake and cupcakes and ice them the day before? No refrigeration necessary?
ReplyDeleteHolly: Yep, I always make mine the day before. I only refrigerate my cakes if they contain fresh fruit or cream, but then I use chocolate to decorate them not fondant because fondant hates the fridge.
ReplyDeletewhere can you get the brown colouring paste?
ReplyDeleteVery cute! Except horses don't have cloven hooves...
ReplyDeleteI do not know what to do. Thanks for the info.
ReplyDeleteSavan vegas
Great idea!!
ReplyDelete